Posts in UnitusTI Release
May 29, 2020: UnitusTI Updates (ver. 6.16)

Here are the latest and greatest additions to UnitusTI!


Zoom Update: Integrating Your Personal Zoom Account in UnitusTI

Where: My Account

The latest enhancement to using Zoom in UnitusTI now allows you to add your personal Zoom account.  Administrators now have the choice of integrating an organizational level Zoom account that will enable all users to add Zoom meetings to UnitusTI calendar events, or, allowing users to sync their own Zoom account to UnitusTI.  

Additional features:

  • Subject line of the event in UnitusTI will also be visible in your Zoom account

  • Waiting Room and manual approval is active for all Zoom video calls

    View the setup guide by clicking the button below:


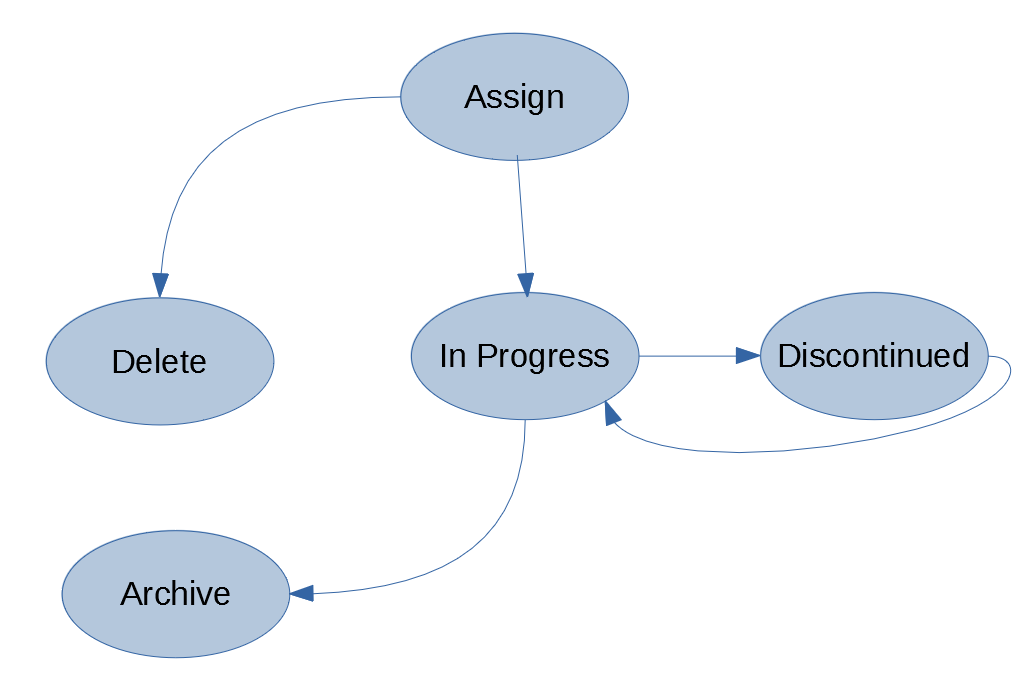
Update to Program List Tabs in Manage Programs

Where: Create Programs/Manage Programs/Client’s Program List Detail page


You asked and we delivered! Now, when working in a Program List tab on the Program List Details page for your client in Manage Programs, you won’t lose your place when using the action icons to view the program history or edit targets and configuration details. UnitusTI will now bring you back to the same tab you were in when you navigate back to it from one of those areas.


Bulk Merge Program Template Updates (for Marketplace subscription content)

Where: Create Programs/Program Templates

Now, merging update from the authors of the Marketplace program package you’re subscribed to is easier than ever with the “Merge All Updates” button.

1. Navigate to Create Programs in the main menu and select “Program Templates”. Select the blue “Program Library” button at the top of the Program Templates page.


2. Program packages you are subscribed to are always at the top of the Program Library page. Select the button “Check for Updates”.


3. If there are available updates for the selected program package, you will see a list describing each update, as usual, with the option to view or merge in the Actions column. A “Merge All Updates” button has been added to this screen in the top right corner, allowing you to bulk merge updates at one time. Note that this action cannot be undone.


Other Fixes We Made:

  1. Fixed an issue where an Error Exception issue was triggered when trying to access My Account

  2. Fixed an issue where the Program List Report/Information Filter not displaying average results when selected for Duration programs


Have questions or issues to report? Our friendly Support team is standing by! Use the support ticket feature in UnitusTI or with the blue “Support” button at the bottom of this page.


May 8, 2020: UnitusTI Updates (ver. 6.15)

Here are the latest and greatest additions to UnitusTI!


Zoom Integration

Where: Center Information and Calendar

We are pleased to announce that the integration of the UnitusTI cloud with Zoom is now complete and you will be able to schedule appointments with your Zoom accounts on the UnitusTI cloud platform. We are thrilled to provide this functionality to assist you in providing remote care to your UnitusTI clients and students.

To get started:

  1. Step 1: Administrators should enable the link between the organization’s Zoom account in the new Center Information tab called “Meeting Providers”. Follow the instructions found here.

  2. Step 2: Set up calendar events for Zoom sessions


Refined Time-Based Data Collection with Milliseconds

Duration and Interval data collection types now allow you to choose milliseconds in your target times (see screenshot below):

Assessment lifecycle.png
 

Have questions or issues to report? Our friendly Support team is standing by! Use the support ticket feature in UnitusTI or with the blue “Support” button at the bottom of this page.

April 22, 2020: UnitusTI Updates (ver. 6.14)

Here are the latest and greatest additions to UnitusTI!


New Functionality in Manage Assessment: Unassign an Assessment from your learner (client or student)

Location: Manage Assessment menu area

You can now discontinue, delete or archive assessments that have been assigned to your clients and students from their Manage Assessment page. Changes made in the Manage Assessment area will not affect the assessment template that is in the Assessment List, so you can freely discontinue or remove an assessment from the Manage Assessment area that has been assigned to a student or Client without risk of losing the original assessment template. (Note: to permanently remove an assessment template so that it’s no longer available to assign to any Client, you would need to delete it from the Assessment List)

How:

  1. Navigate to Assessment in the main menu and select Manage Assessment

  2. Select the Client

  3. Locate the assessment you wish to remove from the client

  4. Choose the “…” icon in the Actions column and then choose either “Discontinue” or “Delete” (if the current status is ““In Progress”, you will have the option to discontinue or delete. If the current status is “Assign”, you can choose Delete. (see list below for more information about these options)

Discontinuing and reopening an “In Progress” assessment

Discontinuing and reopening an “In Progress” assessment


New Functionality in Manage Assessment: Assessment Execution Status

Location: Manage Assessment menu area

Assessment life cycle and flow.

Assessment life cycle and flow.

Assigned assessments have a life cycle with the following states:

  1. ASSIGN: Status of an assessment that has been assigned to a client but not yet executed. Once the assessment has been started (in Run Assessment), the status will change to IN_PROGRESS.

  2. IN_PROGRESS: Status of an assigned assessment that has been executed at least once. In Progress assessments can be discontinued, reopened or archived (deleted).

  3. ARCHIVE: When an “In Progress” assessment is deleted, it’s status changes to “Archive”. This allows the assessment’s execution history to remain available from the “Assessments” tab. Archived assessments are no longer available in Run Assessment and they cannot be restored to an active status. A new instance of the assessment can be assigned to the client at any time. Important: When the assessment has been archived there is no way to restore it, users can assign the same assessment and it will begin recording data as a different assessment. (Archived assessments can be restored for a fee.)

  4. DELETED: Status of an assigned assessment that has been deleted from an assigned Client. A deleted assessment is no longer displayed in the “Assessments” tab of the Client’s Manage Assessments page nor in the Client’s Run Assessment area, however it can be reassigned to the Client at any time from the “Assign Assessment” tab.

  5. DISCONTINUED: Assigned assessments can now be discontinued and resumed at a later date with no break in the historical execution data. A discontinued assessment remains in the "Assigned Assessments" tab along with any historical execution data but its execution ability is paused. Prior execution data is stored in the History. The assessment will not appear in the Run Assessment area until it is reopened, which can be done by choosing the “Reopen” option from the Actions column in the Manage Assessment page. Users can reopen and pause an assigned assessment as many times as needed.

Note that the “Status” column for the Assessment List menu area has not changed. The “status” column for that area will continue to show the publication status of an assessment (i.e. Draft or Published).


Updates to Security Role: “Teacher”

  1. The Teacher security role can now use the Program Queue feature to prepare program lists ahead of student sessions. The program queue can be preset with chosen programs and it will also auto populate with programs you’ve started running while you are logged in (it will refresh upon logout). See how the Program Queue works in this short tutorial video: https://youtu.be/guoqlWjQt1A.

  2. The Teacher security role can now preview the assessments in the Assessment List to see all the components that are part of the assessment before assigning it to a student (the Introduction, questions, demographic fields, supplemental materials and scoring)

Assessment - teacher role preview.gif

Have questions or issues to report? Our friendly Support team is standing by! Use the support ticket feature in UnitusTI or with the blue “Support” button at the bottom of this page.

UnitusTI system updates - version release 6.11*

*Note that an email sent out announcing this release incorrectly stated that it was version 7.0. Our apologies for any confusion, this is actually version 6.11!

Latest and Greatest UnitusTI Updates - November 21, 2019


Assessments Dashboard - Section 2a.PNG

New Feature! The Assessment Dashboard

As the first stage in our rollout of the highly anticipated "Dashboard" reporting feature, we're pleased to announce that your account has now been enabled with an Assessment Dashboard. You will see a new menu option in your main menu: Dashboard.

The Assessment Dashboard is a reporting tool with 17 preset charts that will automatically populate with data from the assessments that you've assigned and executed with your clients. Snapshots of client and user assignments, assessment status, totals for executions assigned and completed, client progress and a detailed scoring section are just some of the information that is automatically updated for you in handy charts.

The dashboard defaults to show all information, but selecting the data within the charts will filter the Dashboard to reflect information related only to the data selected. Use the "Clear Filter" button to reset the information to the default view again.

Click here to get the Assessment Dashboard Overview and learn more about this new feature.

Note: Assessments are created and managed from the Assessment main menu area. See help videos on creating, assigning and running assessments here.

We look forward to bringing you even more updates to the Dashboard reporting feature, so stay tuned!


New Fields in the Client Information page/“Medical Details” tab

Now you can include valuable information about medications a client is taking in the client's profile.  To add this information, navigate to Center Clients, select the client and then select the "update account" icon to get to the Client Information page.  Scroll down to the bottom of the page and select the Medical Details tab where you can now enter:

  • Medications

  • Medication Information

Select the "Save" button (top right corner of the page) and you are all done!


Update to “Teacher” Security Role

We have discovered a potential security issue within the "Teacher" security role, requiring us to disable the following permissions within that role:

  • Permission to add clients (removed)

  • Permission to deactivate clients (removed)

If you have assigned this role to users and wish that they continue to have these permissions, you might consider using one of the following roles: Administrator, High Level, Medium Level. 

The updated Security Roles table can be found in our Help Articles page.

August 27, 2019: UnitusTI Updates (ver. 6.10)

Here are the latest and greatest additions to UnitusTI - version 6.10!


New Security Roles

To better serve the needs of our K-12 educational community, we've added three new roles: Teacher, Paraeducator and Parent. With these three new roles, we hope to give users additional flexibility when assigning permissions.

Tip: If one role isn't enough, assign multiple roles to give your users the permissions they need!

Click here to check out the details in our updated Security Roles Table.


No More Duplicate Targets

To alleviate confusion and enable you to manage targets with greater clarity, you will no longer be able to save targets that have the same name and description. This will affect targets created in program templates and when adding custom targets in an assigned program. When you try to save a duplicate target, an error message will appear in the top of your UnitusTI workspace to say "You can't add a target with the same name and description". Simply adjust the target name or description to be able to save.

clone_targets.gif

New Feature: Cloning Targets in Program Templates

A "clone" icon has been added to the Targets section within program templates.  Use it to streamline the target creation process.  The word [COPY] will automatically be populated in the description field to prevent an exact duplicate from being created, however you can write in your own description or change the target name. 


Update to Materials Target Editor

Adding targets to program templates that use UnitusTI Materials has become more streamlined with the ability to add a target name and description right from the editor screen.


Adjusting the Time in Time-based Targets

You can now adjust the time setting of your time-based target types right in the program template. In the targets section of your program template, when either selecting an existing target name, or adding a new target, sliders will display that you can use to select the time value in hours, minutes and seconds. 

Note: this is for program templates with a Target Type of TIME.


Have questions or issues to report? Our friendly Support team is standing by! Use the support ticket feature in UnitusTI or email them directly.

November 14, 2018: UnitusTI Updates (ver. 6.7.1)

Here are the latest updates from Mundo Pato and UnitusTI!

If you've ever wished that you could assign specific program lists to specific users, we have great news for you! We are excited to roll out our program list restriction feature, which allows you to designate which users are able to run certain program lists. For example, you may want your client's parent or guardian to be able to run a home program list, but you don't want them to be able to access the lists of programs that are run in center or with an RBT or therapist - the list restriction feature can help you accomplish this. Check out our video tutorial here, and feel free to contact the support team with any questions you may have.


More exciting features are on the way in the coming weeks - stay tuned for more updates!


As always, our support team is standing by to answer any questions you may have - submit a support ticket from within the UnitusTI platform, or email us directly at unitustisupport@mundopato.com


Have a great day!

July 20, 2018: UnitusTI Updates (version 6.6)

Good morning!

We are thrilled to announce the release of our long-awaited assessment module!  This complex module will allow you to create your own assessments, map the results and questions to your own programs and generate a suggested list of programs for each client based on their results.  Stay tuned for assessments developed by the authors of your subscribed curriculum!  Attached you'll find a PDF that will answer some of the questions that you might have about what the assessment module can do; please feel free to contact the support team for any other questions that you have about the capability of this exciting new development!

Video tutorials for the assessment module can be found here, as well as linked directly inside UnitusTI.  We look forward to your feedback!

In addition to the exciting news of the assessment module, we are also happy to announce that prompts assignments can now be edited after the program assignment process has been completed!  Check out this new option in the Edit Configuration page for your client's programs.

Additionally, we have increased the character limit in Session Notes to 5000 characters.

We've also added three new prompts to our master prompts list to further enhance your data collection options:

  • Indirect Verbal Prompt (IVP)

  • 1 Redirection (1R)

  • 2 Redirections (2R)

  • 3 Redirections (3R)

May 24, 2018: UnitusTI Updates (version 6.5.4)

Good morning!  We are pleased to announce the following updates to UnitusTI:

1. Delete program lists

You can now delete an unused program list right from Manage Programs!  Have a program list that you created in error?  Or a list that is no longer in use?  From Manage Programs, select the program list you wish to delete, then move or delete any programs within it and the option to "Delete Program List" will appear (see screenshot below).  

Once you click "Delete program list", a confirmation popup will appear.  Enter a quick note for your records and click "Yes" to delete the list.


2. New filtering options in Internal Communication and client assignment area:

We've listened to your feedback and added search fields in the following areas of UnitusTI:

  • Internal Communication "To" field: Now, when you compose a new Internal Communication message and to select your recipient(s), you will see white search fields at the top of the columns in the Select User screen that you may use to help you search for a User ID or Name more quickly.

Step 1: Go to Internal Communication (in My Workspace), select the red circle to compose a new message), then select the blue "Select" button next to the "To" field:

Step 1: Go to Internal Communication (in My Workspace), select the red circle to compose a new message), then select the blue "Select" button next to the "To" field:

Step 2: Enter search terms in one of the white fields located under the column headers "User ID" and "Name" to narrow your search results

Step 2: Enter search terms in one of the white fields located under the column headers "User ID" and "Name" to narrow your search results


  • Assigning clients to users: Search boxes have been added to the Name and Last Name columns in the Assign Clients area (see screenshot below). Type in a name or last name in the respective fields to find them more quickly!

3. Confirmation to delete an additional field in a program template:

A confirmation window will now pop up when you select the trash can icon next to an additional field that you have created (see screenshot below).


4. Other additions and fixes:

  • Increased file sizes in session notes and program templates: Now, you can upload a file as big as 15 megabytes when attaching files to your session notes and up to 30 megabytes when uploading a file to the Supplemental Information section of your program templates.

  • Logo area resized

  • Fixed an issue with exporting the Program List Report to Excel

  • Fixed an issue where user names were duplicated in the Daily Program Report and Program Implementation Record report


March 1, 2018: UnitusTI updates (version 6.4)

Here are the latest and greatest updates to UnitusTI:


Assigning Users to Clients

We are thrilled to announce that we have heard your requests - you can now assign users to a new client right from the client creation page!  Never again will you enter a new client and save their information, only to wonder why they don't instantly appear in the client list - you can create and assign a client all in the same page!

Once you enter the required information to save a new client, click "Save" at the top of the screen, then scroll down to the tab labeled "Team Members" and select the button labeled "Add Team Members":

Select all applicable users from your current user list, including yourself, and you're ready to start programming for this client!

Our video tutorial "Adding a Center Client" has been updated to include this new feature; check it out here: Adding a Center Client.

Clients can still be assigned to newly created users from the User List page; see our tutorial Client Assignment to see examples of both methods of allowing user access to client information.  If you have questions about this new development, please do not hesitate to reach out to the support team by creating a support ticket from within the UnitusTI application.


Even More Information in the Information Filter

The Information Filter has been updated with an option to include the cumulative percentage of client responding in a given reporting period; this is in addition to our existing capability that allows you to include the average results from that same reporting period!  To add this information to your report, select your specified dates of program execution in the Program List Report for your client, then click over to the Information Filter:

Enable the average results and/or cumulative percentage and click "Apply Filters":

Listed with the information for each program are the calculations that you selected in the filter:

Check out our updated Information Filter tutorial to get the full scoop: Information Filter, and do not hesitate to reach out to the support team with any questions you might have!

Helpful Videos and Tool Tips

Need a refresher on that End Session button?  Wondering how to assign a program with descending duration data collection?  Throughout UnitusTI, we've placed links to related tutorial videos to help you troubleshoot issues and get your questions answered quickly.  Just look for the blue icon with a question mark:

Select a video topic, and the video will launch in a pop-up window right in your browser; no need to navigate to a different webpage to watch the video:

We have also embedded tooltips throughout the UnitusTI platform; hold your mouse over an icon or button to see a description of what that button does:

You can also hover your mouse over various text areas throughout the application to get a little more information about what certain words or phrases mean:

The support team is standing by to answer your questions about these new features, as well as any other questions you may have about the UnitusTI platform.  Please feel free to submit a support ticket from within the UnitusTI application, and one of our support staff will get back to you as soon as possible.